Unsubscribes are an inevitable part of email marketing, often driven by consumers feeling overwhelmed by too many emails. However, a well-designed email preference centre (EPC) can transform this challenge into an opportunity.
By offering subscribers control over the type and frequency of emails they receive, an EPC improves user experience, ensures adherence to anti-spam laws, and preserves the right to opt-out. Incorporating an EPC into your strategy fosters trust, enhances engagement, and reduces churn, making it a vital tool for modern email marketing.
What is an email preference centre?
An EPC allows your audience to have control over what communications they would like to receive from you. Without an EPC in place, your audience has two options:
- Keep receiving all email communications
- Unsubscribe from all email communications
However, your audience might enjoy some of your emails but not others; this doesn’t mean they should be removed from your database entirely. An EPC allows your audience to have that customisation and control over the exact inbox experience that they want.
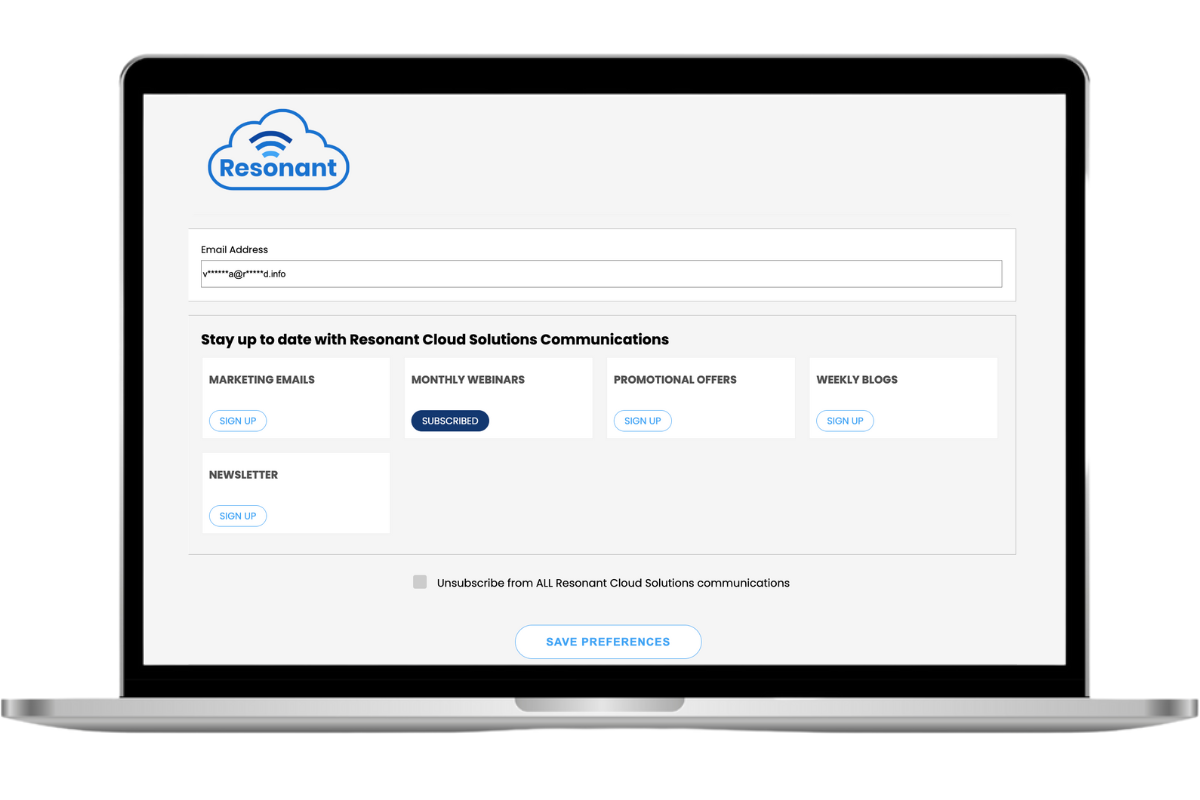
See below an example of an EPC built in Marketing Cloud Account Engagement (MCAE):

This allows the user to pick which brands or communication they want to be subscribed to and which ones they want to opt-out from, while also allowing them to opt-out of all email communications. This is a user-friendly way in which the user can have a say on what they’re subscribed to.
Now that you understand what an EPC does, let’s explore the benefits.
The opportunities of an email preference centre
EPC are advantageous for your overall customer experience. The level of personalisation can lead to an increase in email engagement and a lower opt-out rate. With the return on investment (ROI) on emails remaining strong, this means that your subscriber audience is your best audience and an EPC helps you learn more about them.
Having a list of preferences from your audiences can help you identify what types of content you should be sending such as newsletters, products, offerings, events or discounts and deals. This can help you prioritise initiatives that are resonating with your database.
Best practices
Not all EPC are the same and you should implement a strategy that is based on your customers’ user experience and behaviours. Here are some tips and tricks to help you get the most out of your EPC:
- Ensure that the link is easy to access – typically at the footer of your email
- The design should be mobile responsive and user-friendly with clear options
- Have clear descriptions about which lists your audiences are opting in or out of
- Respond to preferences in a timely manner to build integrity with your audience
- Ensure your business has a robust strategy to respect preferences
Build your email preference centre
There are a few things you need to know to create an EPC, however, these requirements might differ depending on which automation platform you’re using – it can be MCAE, Braze, Klaviyo, Mailchimp or others.
The first step is to plan out how you want your lists and audiences to look like. Then you can move to create these lists as ‘public lists’ on your selected platform to ensure these lists are selectable in your EPC settings.
The below section contains instructions on how to set up your EPC on MCAE, Braze, Klaviyo and MailChimp:
MCAE
For example in MCAE you’ll need to follow the below steps to build your EPC:
- Plan out your lists and different audiences. Create those lists in MCAE, ensuring that you select ‘Public List’ – this means that it will be selectable in your EPC settings
- Work with your web developer to create a layout template and configure the styling of the page to reflect your branding with HTML coding and CSS styling – you can apply this to the default EPC if you only have one, or create a custom EPC if you have more than one
- Make it live by adding the unique link to your email footers. For the custom EPC, there is a three-digit ID at the end of the EPC link that will be used to get your unique link. This three-digit ID can be found by following these steps:
- Click ‘Account Engagement Email’ tab
- Select ‘Preference Page’
- Select the preference page you want to get the ID for
- Get the three digits at the end of the link. In this instance it’s 259. See screenshot below:

To add the EPC to your email, insert the merge field and then update the field to include the ID. For example, if it is:
- {{{EmailPreferenceCenter}}} – that would go to the default EPC, but if you utilise
- {{{EmailPreferenceCenter_259}}} then that will go to your custom EPC
*Note that the spelling of centre in Account Engagement uses American English – ensure to write it as: center
How to do this:
- Go into the ‘Lightning Email Builder’
- Go to your footer and type ‘Manage Preferences’ or what you would like as your EPC label
- Once typed, click somewhere next to the manage preferences text
- Click ‘Merge Fields’
- Click ‘Other’
- Select ‘Email Preference Center’ from the merge field options
- Click ‘Insert’ to place it next to your text
- Then you would cut the inserted {{{EmailPreferenceCenter}}}
- Highlight your text ‘Manage Preferences’, add a hyperlink to the text, and paste your EPC value into the link URL section – {{{EmailPreferenceCenter_259}}}. See screenshot below:

Braze
In Braze you will need to follow the below steps to create your EPC:
- Navigate to ‘Audience’
- On the subscription group management tab, create your subscription groups (i.e. public lists/types of communication)
- Once created, go to the ‘Email Preference Center’ tab
- Name the EPC and add subscription groups – here you can define available subscription groups and manage the ‘Subscribe to All/Unsubscribe from All’ checkbox
- Customise the EPC using a drag-and-drop editor
- Customise your confirmation page. This page can be edited by selecting ‘Confirmation Page’ at the top of the drag-and-drop editor window. The same drag-and-drop capabilities apply to the styling of the confirmation page
- Preview and launch your EPC
Read more here.
Klaviyo
In Klaviyo you will need to follow the below steps to create your EPC:
Firstly, you have to find your account’s default consent pages:
- Navigate to ‘Audience’
- Click ‘Growth Tools’
- Select ‘Customise Subscribe and Preferences Pages’
- Select ‘Account Default Pages’
- The pages available to edit include: preference page, subscribe page, email confirmation and email unsubscribe page
You can customise the design for your consent pages by:
- Finding the consent page you’d like to edit (e.g. preference page)
- Click ‘Edit Page’
- This will bring you to its respective editor, where you can customise the branding to fit your brand through styles and blocks
- Click ‘Publish’ once ready
Read more here.
Mailchimp
In Mailchimp you will need to follow the below steps to create your EPC:
- Log into your Mailchimp account
- Click ‘Audience’
- Click ‘All Contacts’
- If you have more than one audience, click the audience drop-down and choose the one you want to work with
- Click ‘Subscriber Preferences’
- Add groups (if you haven’t already) – each group can contain types of communication. For example, you may have a group called ‘Products & Services’ and the groups within this one are individual products. You can create as many as you need.
- Once you have created your groups, when you return to the subscriber preferences page, you can begin building your EPC.
- These steps will take you to the EPC drag-and-drop builder to customise the content, styling and to build the URL
- When you are done editing, click ‘Save and Continue’, and then click ‘Publish’
Read more here.
How to use your EPC
The EPC is not only beneficial for users but also provides valuable insights for marketers. It enables marketers to leverage preference data for campaign segmentation, whether for broad-reaching campaigns or more targeted approaches.
For example, if you work for Bunnings, you wouldn’t have just one customer profile. Instead, you might have multiple key audience segments, each with their own preferences and respective lists. This allows you to tailor messaging accordingly, ensuring campaigns resonate with the right audience. Below are two types of examples of customer profiles that may apply for Bunnings:
- Trades/Business Accounts
- Trades > Carpentry
- Trades > Landscaping
- Trades > Plumbing
- Promotions/Sales
- Direct Customer (not a business)
- Direct > Gardening
- Direct > Workshops
- Direct > Renovations
- Direct > Home Inspiration
- Promotions/Sales
A Bunnings marketer promoting a new gardening workshop could target:
- The entire Direct > Workshops list, or
- People interested in both Direct > Workshops AND Direct > Gardening lists
If you are wanting to target everyone in the Direct > Workshop list, you can send to the entire list. However, if you prefer a more targeted approach, reaching only those opted-in to both Direct > Workshops and Direct > Gardening, in MCAE you will need to use a dynamic list for this (or segment in Klaviyo, Braze, or Mailchimp).
In case of MCAE, this is done by using the Match Type: ‘Match All’ and using the Public List Opt-In Status for each list as your criteria, as shown below:

The example provided is only scratching the surface, and there are many ways to drill down on targeted lists. This approach improves engagement, respects user preferences, and supports both wide-reaching and tailored marketing efforts.
Ready to boost your email engagement and retain your audience? Contact us and our consultants will tailor a strategy to keep your audience connected and engaged. No matter which automation platform you use, we’re here to support you.
Need a hand?
Our team of experts are ready to help you with all your Salesforce and MCAE needs. We can help you supercharge your lead generation efforts with Digital Marketing Strategies, MCAE forms, integration of your third-party forms, and more! Send us a message by filling out the form below.

